Starting yoga can feel overwhelming, but with the 5 quick and effective yoga poses for beginners, you can build a gentle, balanced, and powerful routine. Whether you want to improve flexibility, relieve tension, or boost strength, these classic asanas (poses) are beginner-friendly, time-efficient, and deeply beneficial for both body and mind.
Why These 5 Yoga Poses Are Ideal for Beginners
- These poses cover mobility, strength, balance, and relaxation — key pillars of a well-rounded yoga practice.
- They require minimal props and can be done in a small space.
- Regular practice cultivates mind-body awareness, increases flexibility, and helps regulate stress.
- These asanas are frequently recommended by fitness and wellness experts as foundational for new yoga practitioners.
The 5 Yoga Poses — Instructions, Benefits & Tips
Here are five highly effective yoga poses for beginners, with detailed how-tos and what makes each pose useful:
1. Cat-Cow (Marjaryasana – Bitilasana)
How to Do It:
- Come to a tabletop position: hands under shoulders, knees under hips.
- Inhale: Drop your belly down, lift your chest, tilt your tailbone — Cow Pose.
- Exhale: Round your spine up, draw your chin to your chest — Cat Pose.
- Continue flowing between Cow and Cat for 5–10 rounds, linking with your breath.
Benefits:
- Warms up the spine, increases mobility, and releases tension in the back and neck.
- Encourages mindful breathing and body awareness.
Tips:
- Move slowly and use each breath to guide your spine.
- If your wrists feel uncomfortable, place a towel or blanket under your palms.
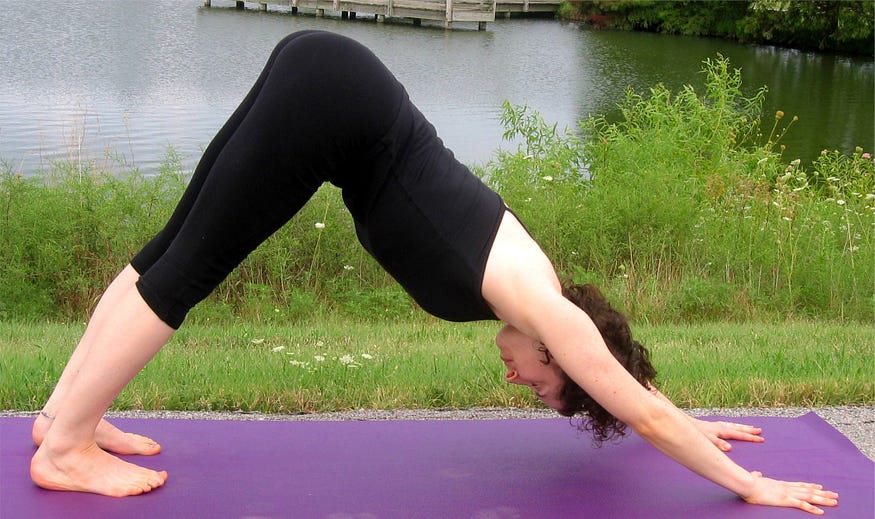
2. Downward-Facing Dog (Adho Mukha Svanasana)
How to Do It:
- From tabletop, tuck your toes under and lift your hips up and back, forming an upside-down “V”.
- Spread your fingers wide, press firmly through your palms, and press your heels towards the ground (they may or may not touch).
- Keep your spine long and your neck relaxed.
Benefits:
- Strengthens arms, shoulders, and legs while stretching the hamstrings and spine.
- Boosts circulation and revitalizes the body.
- Helps relieve stiffness in the back and legs.
Tips:
- Bend your knees slightly if your hamstrings are tight.
- Focus on lifting your hips rather than forcing your heels down.
- Hold for 3–5 steady breaths as a beginner.
3. Child’s Pose (Balasana)
How to Do It:
- Kneel on the mat with your big toes touching and knees hip-width apart.
- Sit back on your heels, then fold forward, extending your arms in front or resting them by your sides. 1
- Rest your forehead gently on the mat. Breathe deeply and settle into the pose.
Benefits:
- Provides a gentle stretch for the hips, thighs, and lower back.
- Calms the mind, reduces stress, and can be a restorative “reset” during a practice.
- Helps with gentle, passive hip opening and release.
Tips:
- Use a cushion or folded blanket under your forehead or knees if needed for comfort.
- Stay in the pose for as long as it feels restful — even 30 seconds helps.
4. Cobra Pose (Bhujangasana)
How to Do It:
- Lie flat on your stomach with your feet together and your hands placed under your shoulders.
- Inhale: Press into your palms, lift your chest off the ground using your back muscles (not just your arms). Keep your elbows slightly bent and close to your body.
- Gaze gently forward or slightly upward, but avoid compressing your neck.
Benefits:
- Strengthens the spine and muscles in the lower back.
- Opens the chest, encouraging better posture and deeper breathing.
- Helps relieve tension and mild back stiffness.
Tips:
- Avoid overextending: lift only as far as is comfortable, especially if you have lower back issues.
- For extra support, you can place a blanket under your pelvis.
5. Tree Pose (Vrikshasana)
How to Do It:
- Stand tall in Mountain Pose (Tadasana) with your feet hip-width apart.
- Shift your weight onto one foot. Place the opposite foot either on your inner thigh or calf (avoid the knee).
- Bring your palms together in front of your chest (or raise them overhead like branches of a tree).
Benefits:
- Improves balance, concentration, and focus.
- Strengthens the legs and core, building stability.
- Enhances body awareness and grounding.
Tips:
- Use a wall or chair for support if you’re just starting to practice balancing.
- Focus on a fixed point (a drishti) in front of you to help maintain stability.
How to Practice These Poses Safely & Effectively
- Start with a warm-up: Do 1–2 minutes of Cat-Cow first to warm your spine.
- Create a mini flow: Try a simple sequence — Cat-Cow → Downward Dog → Cobra → Child’s Pose → Tree — to experience a balanced practice.
- Use props if needed: Blocks, straps, blankets, or a wall can all support your alignment and comfort.
- Listen to your body: Focus on how each pose feels. Don’t push into pain — yoga should challenge you, but not harm you.
- Breathe consciously: Coordinate your movements with your breath — inhaling when opening/spreading, exhaling during folding/contraction.
- Practice consistently: Even 10 minutes per day, 3–4 times a week, helps you build strength, flexibility, and confidence.
Final Thoughts
These 5 quick and effective yoga poses for beginners are a well-rounded, accessible way to begin your yoga journey. They support flexibility, strength, balance, and relaxation — the foundational elements of any sustainable yoga practice. With consistent practice and mindful alignment, you’ll likely notice improvements in your posture, mobility, and mental clarity over time.