Table of Contents
Ready to shine on your big day? Achieving the perfect bridal makeup look is all about preparation, technique, and quality products that last from ceremony to reception. This comprehensive guide walks you through a step-by-step plan to help you create a flawless, photogenic bridal makeup look you’ll love—and that truly lasts.
Why Bridal Makeup Needs a Different Approach
Bridal makeup isn’t just “makeup for a party”—it’s a full day affair, often under strong lights, in photographs, with tears, hugs, movement, and many changes of scene. As explained in expert bridal makeup guides, you’ll need:
- A long-lasting formula and set of techniques.
- A photo-ready look (cameras pick up textures, shine, uneven tones).
- Products and prep tailored to your skin type, lighting and outfits.
With that in mind, here is a full blueprint for perfect bridal makeup.
Step 1: Pre-Wedding Skin Preparation (Weeks Ahead)
Why it matters: Great makeup sits on good skin. A smooth, hydrated base sets you up for success.
Key actions:
- Cleanse & exfoliate regularly to remove dead skin cells and reveal fresh texture.
- Moisturise appropriately for your skin type (dry: richer cream, oily: lighter gel) to maintain barrier health.
- SPF daily to prevent pigmentation or dullness—important for photo clarity.
- Facials or skin treatments 2-4 weeks before the wedding (not the day of) to avoid irritation.
- Patch-test new products especially if you’re doing a trial run for your bridal makeup.
Step 2: On the Day – Base & Primer

Objective: Create a flawless, even canvas, minimise pores/shiny zones, and ensure your makeup lasts.
How to do:
- Start with a primer suited to your skin: mattifying for oily, hydrating for dry. This helps your foundation hold.
- Choose a full-coverage, long-wear foundation that matches your skin tone and undertone perfectly (test in daylight).
- Use concealer to cover under-eyes, blemishes, redness. Some bridal guides recommend colour-correctors for greater precision.
- Set lightly with a finely-milled translucent powder in key areas (T-zone), but keep high points (cheeks) slightly dewy for dimension.
Pro tips:
- Apply foundation from centre of face outward for the most natural blend.
- Consider airbrush or HD makeup if lots of photography/video is planned.
- Match your neck and ears to avoid visible makeup lines.
Step 3: Contour, Highlight & Blush for Dimension
Why: Bridal makeup tolerates stronger definition because photos flatten faces; soft contour & highlight give structure and glow.
How to do:
- Contour under cheekbones, jawline, temples (use powder or cream) but blend fully.
- Highlighter on top of cheekbones, bridge of nose, cupid’s bow to catch light.
- Blush: Choose a flush that complements your outfit and skin tone (peach/rosy for warm skin, berry for cool). Apply to apples of cheeks and sweep back.
Tip: Avoid harsh lines—blend well to keep look soft yet defined.
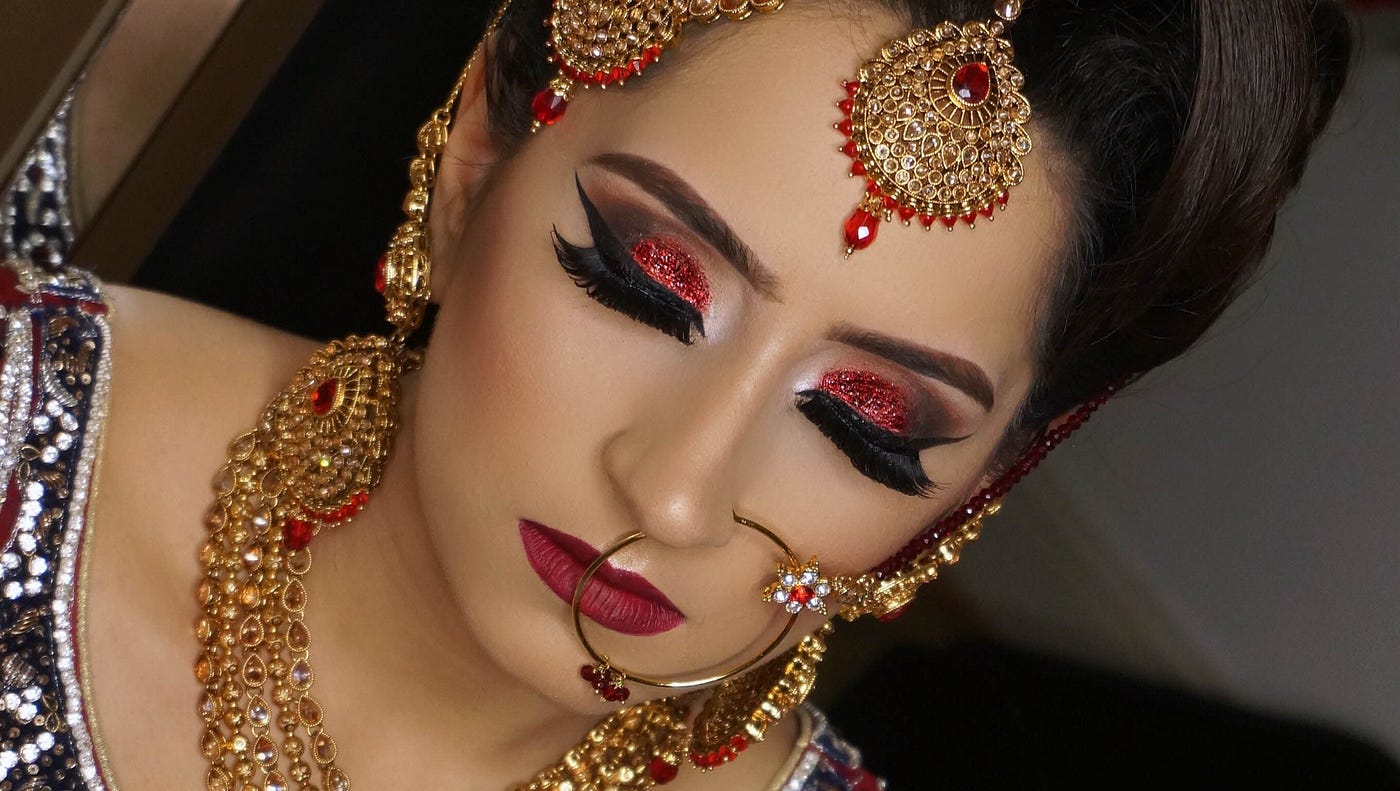
Step 4: Eye Makeup – Make the Eyes Pop

Eyes are often the focal point in bridal makeup: they must look open, expressive, and durable.
Steps:
- Eye primer to stop creasing and ensure longevity.
- Brows: Define shape with brow pencil/powder, set with clear gel—well-groomed brows frame the face.
- Eyeshadows: Choose :
- A transitional matte shade in crease,
- A deeper shade in outer corner,
- A shimmer or metallic on lid (especially for Indian bridal looks).
- Eyeliner & kajal: Create definition—winged or soft depending on style.
- False lashes + waterproof mascara: Bridal makeup requires durability + drama.
- Highlight inner corners & brow bone to brighten the eyes region.
Photos/lighting tip: Avoid overly glittery formulas unless it suits your outfit and venue—flash can exaggerate textures.
Step 5: Lips – Colour + Longevity
Objective: A lip colour that enhances the look, complements outfit and wears through the event (including ceremonies, photos, food, hugs).
How to do:
- Outline lips with a lip liner (same shade or slightly deeper) to prevent feathering.
- Fill with long-wear lipstick (matte or satin depending on comfort).
- For traditional bridal look: rich reds, deep berries, classic pinks. For modern brides: nude-rose or soft peach depending on theme.
- Blot lightly and re-apply one layer for durability.
- Finish with a clear gloss or balm if you want radiance—but ensure it’s non-sticky for comfort.
Step 6: Setting & Finishing – Lock It In

Set your look to withstand hours, photos and movement.
Steps:
- Use a setting powder in high-shine zones like T-zone, under eyes. But avoid over-powdering; cheeks should still glow.
- Setting spray: A must-have. Locks all products together, prevents shifting and melting.
- Prepare a touch-up kit for the day: lipstick, mini powder, blotting papers, cotton swabs.
- For weddings in hot/humid climates, consider waterproof or sweat-resistant products.
Step 7: Hairline, Neck & Body Blending
Often overlooked but crucial: your makeup shouldn’t end at the chin. The bridal makeup look must extend seamlessly to neck, shoulders, and hairline.
How to handle:
- Match foundation to neck and ears to avoid visible lines.
- Add a bit of body highlighter or bronzer on collarbones and shoulders (for off-shoulder or sleeveless outfits).
- Ensure hairline is clean, edges blended—no harsh contrast between face and hair.
- Clean any product fallout from hair, ears, neck. Use a small sponge to wipe.
- If veiling or dupatta falls across your face, make sure blush/contour look good with that silhouette.
Extra Tips & Common Pitfalls
- Do a trial makeup session 1–2 weeks before. This ensures product compatibility, colour match, hair style coordination.
- Communicate clearly with your MUA: share references, say what you like/dislike.
- Career timing: Start skin prep 3–6 months ahead if possible—many bridal guides stress early prep.
- Watch lighting: Indoors vs outdoor, daylight vs evening, photography vs video—make sure your makeup works in all.
- Avoid changing major skincare products just days before—risk of breakout or irritation.
- Keep hydrated and sleep well in the week leading up—rested skin = better makeup outcome.
- Check for allergies to lash adhesives, pigments, fragrance.
- Match the look to your overall style/theme: Traditional lehenga vs modern gown may call for different intensity/colours.
“Bridal makeup” is not just about “looking pretty” for the wedding—it’s about looking your best, feeling confident, comfortable, and captured beautifully in memories for a lifetime. By following this detailed 7-step blueprint—from skin prep to setting—you’ll be well on your way to a flawless, long-wear bridal look tailored to your style, skin, and vision.
Frequently Asked Questions (FAQs) About Bridal Makeup
How can I do my own bridal makeup at home?
You can do your bridal makeup at home by following a step-by-step routine — starting with skin prep, primer, foundation, concealer, eye makeup, lips, and setting spray. Choose long-wear, waterproof products and practice your look at least once before your wedding day.
What are the most important steps in bridal makeup?
The key steps include cleansing and moisturizing, using a primer, applying HD foundation and concealer, contouring and highlighting, doing eye and lip makeup, and finally sealing it with a setting spray. Each step ensures your makeup lasts all day and looks great in photos.
How do I make my bridal makeup last all day?
To make your makeup last, use a mattifying primer, waterproof foundation and mascara, and always set your look with loose powder and a long-lasting setting spray. Carry a mini touch-up kit with lipstick, blotting paper, and powder for quick fixes.
What is the best foundation for bridal makeup?
The best foundation for bridal makeup is one that offers full coverage, HD finish, and long wear without oxidizing. Popular choices include Estee Lauder Double Wear, MAC Studio Fix Fluid, and Maybelline Superstay 24H Foundation. Always test your shade in natural light.
Should I choose airbrush or traditional makeup for my wedding?
Airbrush makeup gives a smooth, lightweight, long-lasting finish and is ideal for humid climates and long events. Traditional makeup can offer a more customizable look. The choice depends on your skin type, event duration, and personal comfort.
When should I do a bridal makeup trial?
Plan your bridal makeup trial at least 2–3 weeks before your wedding. This helps you finalize shades, test product compatibility, and make adjustments to ensure your look matches your outfit, jewelry, and lighting conditions.
What’s the best lipstick shade for brides?
Your lipstick should complement your outfit and skin tone. For traditional brides, classic reds, berries, and maroons work beautifully. For modern brides, soft pinks, peaches, and nudes offer a chic, elegant touch. Use a long-lasting matte or satin formula for durability.
How can I avoid my makeup looking cakey or heavy?
Prep your skin well before applying makeup. Use a hydrating primer, apply thin layers of foundation, and blend thoroughly with a damp beauty sponge. Finish with a light dusting of setting powder — not too much — and a hydrating setting spray for a natural glow.
What skincare routine should I follow before bridal makeup?
Start your bridal skincare routine at least one month before your wedding. Cleanse, exfoliate twice a week, moisturize daily, and apply sunscreen. A few days before the big day, use a gentle face mask for hydration and glow. Avoid trying new products right before the event.
How long does bridal makeup take to complete?
Professional bridal makeup usually takes around 1.5 to 2 hours, including skin prep and hairstyling. If you’re doing it yourself, allow at least 2–2.5 hours to take your time and get the perfect finish without rushing.
Can I wear heavy eye makeup for a day wedding?
For day weddings, stick to soft glam looks—neutral tones, soft shimmer, and subtle eyeliner. Heavy eye makeup is best reserved for evening or indoor weddings with artificial lighting, where deeper tones and bolder styles photograph beautifully.
What is the biggest mistake brides make with their makeup?
Common mistakes include using the wrong foundation shade, skipping primer, not blending makeup properly, or trying new products last-minute. Always do a trial and avoid experimenting too close to your wedding day.
Can I mix traditional and modern bridal makeup looks?
Absolutely! A combination of traditional elements (like bold eyeliner or red lips) with modern trends (like dewy skin or soft contouring) creates a timeless yet stylish look that photographs beautifully and suits all wedding themes.
How can I make my bridal makeup look natural?
To achieve a natural bridal makeup look, focus on a glowy base, neutral tones, and well-blended layers. Skip heavy contouring and overly matte products. Opt for light-reflective highlighters and soft blush for a radiant finish.
Should I hire a professional makeup artist or do it myself?
If you’re confident with makeup and have practiced, you can do it yourself at home. However, hiring a professional makeup artist ensures expertise, product knowledge, and stress-free application — especially for high-pressure wedding days.